
What does the printing term Bleed mean?
Bleed refers to anything that prints past the edge of where a document is to be trimmed. The bleed will be trimmed off, but it is basically a safety precaution so that the piece doesn’t end up with unprinted edges. Most machines can’t print off the edge of a page, so we lay out the document to print on a larger sheet of paper. On this larger sheet, we will be able to see the marks where the piece should trim, and the images and artwork that extend beyond the trim — that is the bleed.
The reason printers require a bleed is because there can be slight shifting during the cutting phase of the job. We ask for a 0.125 inch bleed on each side of the document; that is more than enough to account for any movement, and the piece will still come out great (even if there is some shifting).

Incorrect Bleed
Incorrect Bleed
The document is shown set up (incorrectly) with no bleed. You can see that the image stops at the edge of the document (the black line). This will likely cause some of the white paper to show on the edge after trimming.

Correct Bleed
Correct Bleed
The document is shown set up (correctly) with a 0.125 inch bleed. The image extends beyond where the document will be cut (the black line). This assures that the edges of the piece are completely covered with the image or graphic after trimming.
Setting Up a Document with Bleed
If you’re not using a professional layout program like Adobe InDesign or QuarkXPress, you can simply add extra height and width to whatever you’re printing. For example, if you’re printing an 8 x 10 photo, you would want to send the file to us at 8.25 x 10.25. That will give you 0.125 bleed on all sides, and we can easily add the crop marks.
With InDesign being the most widely used layout program, we’ll use that for the following tutorial (shown on a Mac).
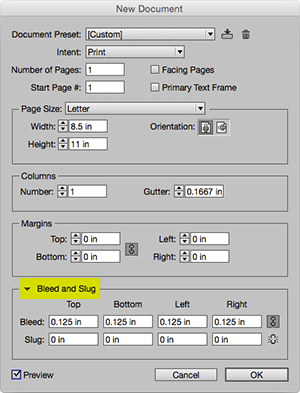
Creating a New Document with Bleed
Creating a New Document with Bleed
Choose New > Document… from the File menu. At the bottom of the dialog box is a section called Bleed and Slug. You may need to click on the arrow to expand the area if you’ve never used this feature. If the link icon to the far right is highlighted, you can type the bleed amount into one field and it will copy to the others.
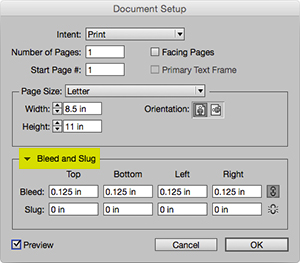
Adding Bleed to an Existing Document
Adding Bleed to an Existing Document
If you’ve already created your document, it’s not too late to add bleed. Choose Document Setup… from the File menu, then add your bleed.
Saving a PDF with Crop Marks and Bleed
Now that you understand what bleed is, you’ll need to make sure it’s properly included in your final PDF for printing.
Once your document is ready to print, find Export… in the File menu. Name your document, choose Adobe PDF (Print) for the Format, and click Save.
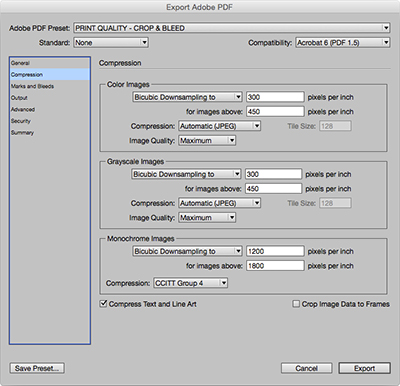
Setting Export Resolution
Setting Export Resolution
Before we get to the crop and bleed settings, you’ll need to make sure that the resolution of your PDF will work for print. Click on the Compression tab in the left column of the new dialog box. Set the resolution that you’d like to use for exporting. If you’re not sure what to do here, just select Bicubic Downsampling to from the image dropdown menus, and type in 300 for pixels per inch.
Keep in mind that if you are using images at a lower resolution than 300, this will not properly increase their quality to 300. [As a quick note, typically anything you grab from the internet will not be high quality enough to look good in a printed piece.]
For more info on resolution for print vs. web, check out our Resolution 101 blog post.
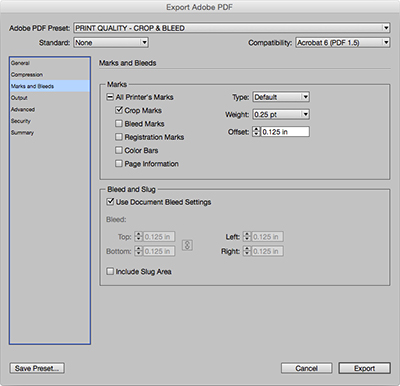
Exporting with Crop Marks and Bleed
Exporting with Crop Marks and Bleed
Next, click on the Marks and Bleeds tab in the left column. Check off the box next to Crop Marks (this places little black lines in your PDF where the document should be trimmed). You will also want to change Offset: to whatever your bleed amount is (setting it to your bleed number will tell the crop marks not to start until after the bleed has ended).
Down below, in the Bleed and Slug section, check off the Use Document Bleed Settings box (assuming you’ve followed the previous steps). You can also manually type in the amount if it differs from your document settings.
Thanks for reading. We hope this answered some of your questions on the basics of prepping a file with bleed. Check out our other How-To posts for more helpful info, or give us a call at 949.988.7777. We’re happy to walk our customers through any issues they’re having with a print job.
-Scott
Graphic Artist at MT Litho Print Services