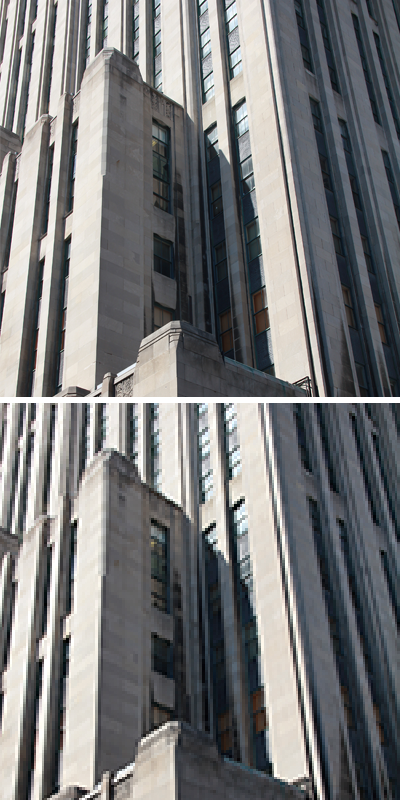
If you’ve ever tried to print out an image you found on the internet, you probably already know that the image isn’t really as large as it appears on your screen. A photo may appear as clear as the top (building) photo here, but it may come out of your printer looking like the bottom photo.
High and Low Resolution Images
One of the first things you need to understand before choosing or creating an image for a printed piece, is how to make sure it’s print quality. The quality of an image is measured by its size and resolution.
An image’s resolution is basically the measure of how much information or detail is stored within its defined space. This can mean the amount of pixels used, or dots it takes to print. PPI (Pixels Per Inch) and DPI (Dots Per Inch) are both used to express image quality. The higher the PPI or DPI number is, the higher potential quality your image can have.
Understanding PPI
The industry standard PPI for a high quality print image is 300, and the average web image resolution is 72 PPI. Most images you see at 72 will look nice and clear on screen but not necessarily in print. Higher PPI also creates larger file sizes, which is another reason most web images will be at this lower resolution – smaller image file sizes allow webpages to load faster.
If you try to print a 72 PPI image you found on the internet, it’ll probably look pixelated and be smaller on paper than you were expecting. Your screen is showing you a crisp and clear eight-inch image at 72 PPI, but it will not print in high quality at that eight-inch size on paper. You’ll have more luck if you need it to print at around two inches.
Of course there are always exceptions. You may run across a 72 PPI image on the web that is sized to 34 inches. This could actually print fine at around eight inches. It’s even possible to find a 300 PPI image on the web, but in most cases you shouldn’t be grabbing random images from the web for professional work. Always take into consideration that the image is most likely copyrighted.
Increasing Resolution and Size
Increasing the size of an image can also make it appear at a lower quality, even if it is a 300 PPI image. In most cases, if you have to expand something beyond 125%, you’ll probably start to see pixelation. So when you have your choice of image size, always pick the largest. Shrinking an image is easy, making it larger isn’t.
I referred to “potential quality” when I first mentioned PPI because an image can be (falsely) given a higher PPI in a program like Adobe Photoshop. Let’s say you see an image on the internet you’d like to print. You open it in Photoshop and see that it’s set to 72 PPI. You could simply change that 72 to a 300… but that won’t increase the quality of the image. Remember how I mentioned that resolution is the measure of stored info/detail? Well, by increasing the number, you’re not adding more detail. You are actually just telling those existing pixels to be interpreted differently by Photoshop.
With all that said, you don’t always need a 300 PPI image for your professional print project to look good. 150 PPI might be OK on certain images that don’t require sharp detail, or a large piece that is meant to be viewed from a distance. The viewer’s eye won’t be able to easily pick up the pixelation or printing dots when standing a few feet away from a poster.
You may not have a design program at your disposal, making it pretty difficult to tell what sizes images actually are. If you’re not sure how large an image or logo really is, try printing it out on your personal printer. This should give you a rough idea how it will look.
Hopefully, by understanding the basics of resolution, you can make informed decisions when looking through images you already have, or at a stock image website for purchasing. Check out our other How-To posts for more helpful info, or give us a call at 949.988.7777. We’re happy to walk our customers through any issues they’re having with a print job.
-Scott
Graphic Artist at MT Litho Print Services